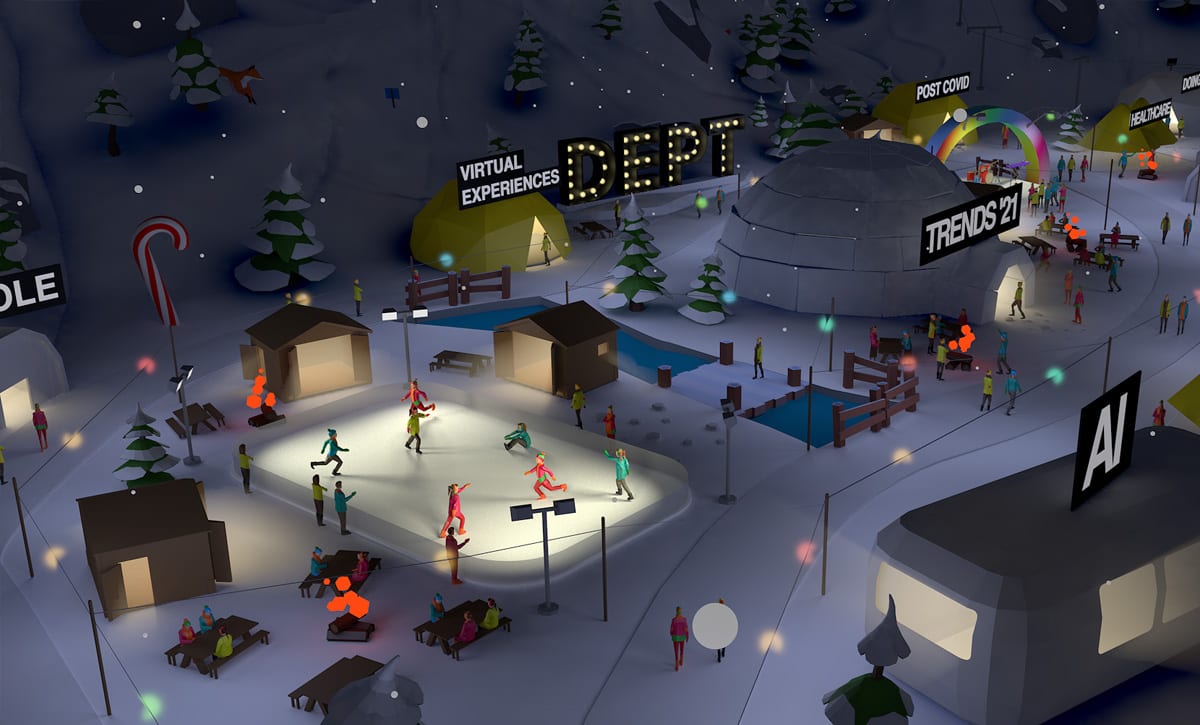

Welcome to a behind the scenes look at DEPT®’s Winter Festival in the making. The project was designed to give an immersive 3D experience, while flexing our technical and creative skills and showing-off our range of capabilities. Just like a computer game, users can explore the grounds and enter buildings to receive snapshot videos of industry trends and pop-culture Top 10s.
As per the brief, we needed a cinematic style camera for the first 15–25 seconds of the user being on the map. there were other requirements but in the interest of brevity, i will be focusing on the main topics, including:
- a camera which supports the first-person mode;
- a smooth path which the camera follows;
- the camera must focus on specific points other than the path towards the end of the animation.
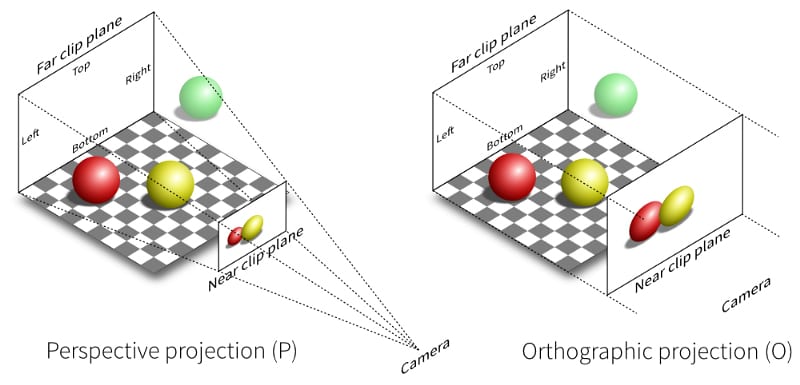
Orthographic vs. perspective cameras
Initially, we had used an orthographic camera, but that wouldn’t suit a first-person style tour of the map. orthographic is good for looking down onto maps from a birds-eye view. Without going into detail about field of view (fov) or clipping planes, it would’ve been difficult to force a solution with an orthographic camera.
A perspective camera is a much better option. It provides a first- person viewing mode with the functionality to zoom in for close-ups of the map’s content. We took a dual approach when using the perspective camera to facilitate a highly interactive 3 d experience. Once the user has finished the tour, we mimicked the orthographic camera by changing the position and fov.
SPLINE CURVES
The next step required creative coding and experimenting with different techniques to move the camera in a cinematic style.
Having spent most of the lockdown reading hundreds of articles around shaders, glsl, three.Js and r3 f, the first thing that came to mind was a spline curve. The basic premise is a smoothed curve which is based around points in 3 d space.
Defining spline curve points
We had to get the points in 3D space, so I added event listeners to the arrow keys:
- Up/down = +/- on the z-axis
- Left/right = +/- on the x-axis
I moved a physical sphere around the map to get the points. The hook we used for attaching event listeners to keys was use key from react-use.
Once we had the raw x, y and z coordinates we could begin the work with generating a spline curve.
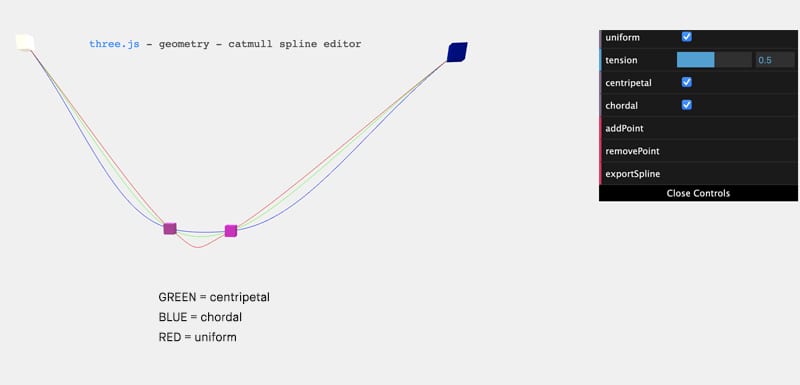
The easiest way to visualise this is to generate a line mesh which shows the curve, and then render this to the 3D map.
R3F has its own declarative syntax for three’s various classes with geometry and materials. Here’s a snippet which is the line rendered in the image above:
The first attempt at moving the camera moved in and around the streets of the village to the left of the map. This didn’t work out too well as it wasn’t smooth enough; the angles of the turns were too great which made the camera too jittery. Below is an example of the code for generating the path for the camera:
Through trial and error we discovered that the fewer points we used, the less jittery the camera would seem to the end-user. Three.js has a class called CatmullRomCurve3 which will generate the spline curve.
Animating the camera
Once we had the curve points, we needed two more things: a way of animating it, and a method in three.js which grabs a new point over time.
Thankfully, both of these have solutions! In three.Js there is a method you can call on the CatmullRomCurve3 instance called getPointAt which given a parameter t (range 0–1) will return a vector3 (a point of the curve). The range 0–1 is essentially the percentage progress along the path. Find more information here.
For animations, react-spring is ideal; it was built by the same people who have been deeply involved with three. The specific tool we used was Use spring From the react-spring package. This can be used in several ways but below is the way we decided to use this hook:
The process of animating
Firstly, we aren’t using the <animated.div> syntax and passing props into the animated div like it shows in the react spring docs; we are using use spring as a standalone hook. Doing it this way means we don’t need to mess around with trying to animate a declarative camera component or map controls from drei using this <animated.div> syntax. I’m sure there would be a way to do this, but with our setup and to be succinct i decided this was the best solution.
Use spring has several hooks and options you can pass in. the config object is the object where you can define things like the duration and clamp; when set to true, the animation stops once the value of the parameter goes over their max value. For example, our one parameter here is a percentage, once this goes over one it will end the animation.
Starting the animation is similar to css transitions. The transition will take effect upon the value changing, so we use local state ended video. This is initially false as the intro video hasn’t finished. Upon finishing, the on end callback of the video is invoked and this changes the ended state state. When this changes to 1, it starts the use spring animation which results in the percentage value starting to increase.
We found the callbacks most useful with use spring were on change, on start and on rest. On start/on rest are the hooks which run once on the start and end of the animation respectively.
On change is an interesting one. we have a value starting at 0 and ending at 1 increasing over time; remember what I said above about get point at on the CatmullRomCurve3? It accepts a value between 0–1 and will return a Vector3 – match made in heaven!
We now have the use Spring and a path, but how are we updating the camera position?
We get the point on the curve using the animated tick value. We also get a point further along the curve by adding 0.06 to the tick. This gives us two values: one value is just the next position we move the camera to, and the second value is the look at value for the camera. By having the look at value be the tick + 0.06 we are ensuring smooth transitions around bends on the curve.
Where does the camera look?
The first part of the whole camera animation only requires us to look in the general direction of the curve. The second half requires rotation while looking at points around the curve (not looking ahead at the path).
Anything above 0.35 and we want to change the look at value to be something other than a point further along the path. In fact, we generated another curve using the very first next cam pos after the tick > 0.35, so this gave a very smooth transition between the look at value being slightly ahead along the curve, to the look at value following an entirely different path.
On the first attempt i tried to use quaternions and matrices. I also tried putting map controls behind an if book until the end but the animation glitched. Whatever i tried i couldn’t get the transition between look at values, where tick changes from around 0.349 to 0.35. i figured out this was due to drei’s map controls and the default target value which is set under the hood in the three library’s controls. This suddenly dawned on me when i removed the map controls and the complex rotations and linear interpolations and it worked seamlessly.
The second idea was to define a second spline curve, which would be used for the look at values. The tricky part is that the splines have different lengths, so if we move along the long curve for positional values at a certain speed, then this speed will be slowed right down if the look at curve is significantly smaller in length. This essentially means the camera looks around too slowly. The solution is to increase the tick by an arbitrary amount for the look at curve when using the get point at method, compared to just the tick used on the curve when used for positional movements. This required a lot of trial and error to perfect.
The final result
Final thoughts
I hope you enjoyed this general overview of how to animate camera paths in a three.Js /r3 f project. I want to give a big shout out to the whole project team, in particular to my colleagues adrian and tunay. We all worked on different aspects of the project; adrian brought everything together in a react-three-fibre project (r3 f), and tunay did some amazing work on the shadows, lighting, baking and performance. I worked on the camera path for the intro sequence.
I also want to mention that there is now a tool that allows you to export animated camera paths from blender. This would’ve made my job so much easier, but it was released just as i was finishing up the project so i didn’t get to take advantage of it!
If i was to give one piece of advice, it would be that if you get a feeling something isn’t going to work (either due to lack of knowledge or that it is literally impossible), then try out something new… don’t dwell on the failures. Just keep going and learn from the setbacks. It’ll be worth it in the end!